If you’re trying to do real chemistry with real constraints, you don’t need a catalog’s worth of gear—you need a small, tough core kit and a plan for upgrading over time. This guide walks you through what’s truly essential, what you can improvise, and which pieces are worth the “buy once, cry once” treatment.
Start with Your Reality Check
Before buying anything, pin down three things:
- What you’re actually going to do in the next 6–12 months (simple reactions and solution prep vs. titrations vs. distillations).
- Where you’re working (kitchen table, spare room, school lab, community makerspace).
- Who will use it (solo adult, teens, mixed group of beginners).
Don’t know where you want to start? Check out the free guide in the resource library for a set of ready‑to‑run labs that walk you in step by step, even if you’re starting from “I just want to do real science” and don’t have a clear plan yet.
For basic wet‑lab work and a low cost lab glassware setup for beginners, you mostly need containers for mixing and heating, and just a couple of tools for measuring volume with reasonable accuracy.
The True Essentials: Core Kit You Actually Need
Think of “essential” as “what lets you do 80% of beginner to intermediate wet‑lab work safely.” For a home setup or essential glassware for high school chemistry lab, the list overlaps a lot .
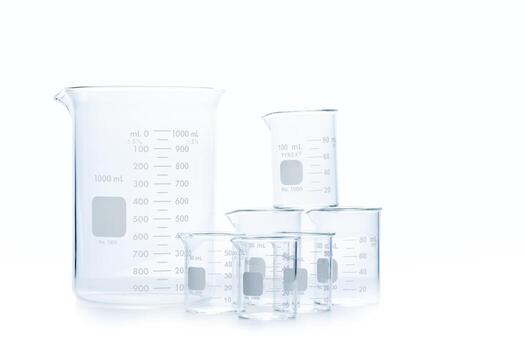
1. Beakers: Your Everyday Workhorses (Splurge a Little)
Why you need them:
- Holding, mixing, dissolving, gentle heating—this is where most solutions live day‑to‑day.
- Easy to pour from and to stir in because of the wide mouth.
What to get:
- Borosilicate glass (often labeled Pyrex, BK7, BORO 3.3, ISO 3819). It handles temperature changes and chemicals much better than cheap soda‑lime glass.
- A small set in a few sizes: ~50 mL, 100 mL, 250 mL, 400–600 mL.
Splurge vs. save:
- Splurge modestly: decent borosilicate beakers last years with normal care.
- Save by skipping huge sets; you don’t need every size on day one.
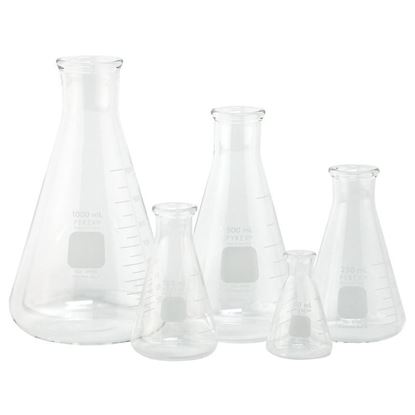
2. Erlenmeyer Flasks: For Swirling and Heating (Buy 1–3 Good Ones)
Why you need them:
- Narrow neck limits splashes and evaporation, makes swirling safer and easier.
- Good for reactions that need moderate heating and mixing without losing half your solution to the air.
What to get:
- Borosilicate Erlenmeyer flasks with volume markings (though not for precision).
- One each of ~125 mL and 250–500 mL covers most beginner work.
Splurge vs. save:
- Splurge on borosilicate here; these see more heating, and cheap glass is more likely to crack with thermal shock.
- You can skip fancy specialized flasks (boiling, filtering, volumetric) until you actually need them.
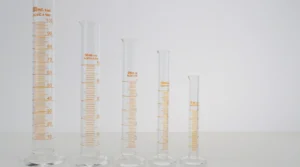
3. Graduated Cylinder: Measurement You Can Trust (Splurge: Class A or Good Class B)
Why you need it:
- Beaker markings are approximate at best; they’re fine for rough volumes, not for recipes that need consistent ratios.
- A single cylinder improves the quality of almost every experiment that involves solutions.
What to get:
- One 50 or 100 mL cylinder is usually enough to start.
- Look for “Class A” (higher accuracy) or decent “Class B” glassware; Class A has about half the volume tolerance of Class B.
Splurge vs. save:
- This is a “buy once, cry once” piece: one accurate cylinder beats three cheap, inconsistent ones.
- If kids are involved or you’re worried about breakage, a good polypropylene cylinder is an acceptable compromise for many beginner tasks.
![]()
4. Test Tubes: Small‑Scale Experiments (Save, but Don’t Skip)
Why you need them:
- Easy small‑scale reactions and quick comparisons without using a lot of chemicals.
- Great for observing color changes, precipitates, gas formation.
What to get:
- A dozen borosilicate tubes (e.g., 13×100 mm or 16×150 mm) plus a rack.
- Optional: a few stoppers if you’ll shake or heat closed systems.
Splurge vs. save:
- Save: standard, no‑frills borosilicate tubes are fine and inexpensive.
- Skip fancy culture tubes and expensive brands until you know you need them.
Splurge vs. Save: Where Quality Really Matters
Here’s a quick view of which lab glassware to splurge on vs save for a basic chemistry glassware for home labs or small programs .
| Item | Role in beginner lab | Splurge or save? | Why |
|---|---|---|---|
| Beakers (borosilicate) | Daily mixing, heating, holding | Mild splurge | Need heat/chemical resistance; a small set does most jobs. |
| Erlenmeyer flasks | Safer swirling, moderate heating | Splurge | Narrow neck + heating = higher stress; buy durable glass. |
| Graduated cylinder | Accurate volume measurement | Splurge | Class A/B accuracy improves every solution you make. |
| Test tubes | Small‑scale tests, demos | Save | Basic borosilicate is cheap and adequate. |
| Volumetric flasks | High‑precision solutions | Buy later | Only needed for high‑precision work; not essential at start. |
| Burettes | Titrations, precise delivery | Buy later/splurge | Critical when you care about drops; invest when you routinely titrate. |
| Distillation glassware | Separate solvents, purify products | Buy much later | Specialized kits; only needed for specific projects. |
What You Can Improvise or Delay
You don’t have to buy everything in glass immediately.
Good Candidates to Delay
- Volumetric flasks
- Designed for extremely precise solution preparation (single calibration mark).
- Wait until you’re doing quantitative analysis that truly requires them.
- Burettes
- Fantastic for titrations and quantitative acid‑base work, but they only shine when your techniques are consistent enough to make use of the precision.
- You can teach and learn titration concepts with syringes and a cylinder first, then upgrade.
- Distillation and reflux kits
- Only needed if you’re regularly purifying solvents, performing organic syntheses, or doing multi‑step reactions.
- For most early‑stage education, simple reactions, and solution prep, they’re overkill.
Safe, Reasonable Improvisations
These are fine for home labs or very early‑stage programs, as long as you keep safety front and center.
- Plastic beakers and cups (for non‑heating tasks)
- Polypropylene or polycarbonate beakers are cheaper, shatterproof, and chemically resistant; they’re good for mixing, dilutions, and storage when you’re not heating.
- Do not use them over open flame or hotplates unless rated for it.
- Food‑grade glass jars (for storage, not reactions)
- Mason jars or similar can store labeled stock solutions away from heat and impact.
- Avoid using them for direct heating; soda‑lime glass handles thermal stress poorly.
- Kitchen‑grade measuring jugs for rough work
- Acceptable when you only need approximate volumes (e.g., demonstration‑level experiments where exact concentration is not critical).
- Always keep them separate from actual kitchen use and clearly labeled.
Safety and Durability: How Not to Waste Money
A lot of budget loss comes from broken gear, not just the purchase price. Basic good habits lengthen the life of even modestly priced borosilicate. Here are some tips:
- Avoid thermal shock: don’t put hot glassware on cold benches or into cold water, and don’t heat cold glass suddenly.
- Use the right piece for the job: flat‑bottom beakers and Erlenmeyers for gentle to moderate heating; round‑bottom or dedicated boiling flasks for more intense, even heating.
- Handle by the body, not the rim or neck; rims and necks are common break points.
- Inspect regularly for scratches, chips, and star cracks; discard anything damaged from your “in‑use” set and repurpose it only for non‑critical roles (e.g., solid waste container) if it’s still safe to handle.
Putting It Together: A Starter Shopping List
Here’s a practical minimal list for a basic chemistry glassware for home labs or a lean teaching setup, assuming mostly solution prep, simple reactions, and qualitative observations.
- 3–4 borosilicate beakers (50, 100, 250, 400–600 mL)
- 2 Erlenmeyer flasks (125 mL, 250–500 mL)
- 1 graduated cylinder (50 or 100 mL, Class A or good Class B)
- 12 borosilicate test tubes + rack
- Optional plastic beakers / jugs for non‑heating tasks
Before you rush to add more specialized pieces, put this small kit through its paces. Run the same few labs multiple times—solution prep, simple reactions, basic separations—and focus on getting smoother, safer, and more consistent each round. The more you and your learners can confidently measure, heat, swirl, and clean with just these basics, the easier it will be to tell when you’ve truly outgrown them and which upgrade (a burette, volumetric flask, or distillation setup) will actually unlock new experiments instead of just cluttering your shelf.
This small kit supports most of the experiments people mean when they talk about an essential glassware for high school chemistry lab or a serious beginner home setup. As your projects grow more quantitative, that’s when volumetric flasks and burettes become worth the upgrade.
Where to Find Inexpensive, Real Glassware
If the sticker shock from new borosilicate glassware is making your eyes water, you’re not alone. One of my favorite hacks is buying used lab glass that’s been cleaned instead of straight from a catalog.
For readers in the U.S., there’s a long‑time seller on eBay (username “papamed4”) who specializes in reselling beakers, flasks, cylinders, and other basics from labs that have shut down at a fraction of the usual price. You’ll see a rotating mix of sizes, so it’s worth checking back when you’re ready to add a piece or two to your setup.
If you’re local to Indianapolis, the same seller regularly brings bins of glassware to the Indy 1500 Gun & Blade Show at the Indiana State Fairgrounds, so you can hand‑pick what you want and skip shipping. I often source my own teaching and apprenticeship glassware this way, so if you’d rather not hunt, you can also purchase starter sets directly through Insanitek once I’ve cleaned, sorted, and bundled them for specific types of labs.