
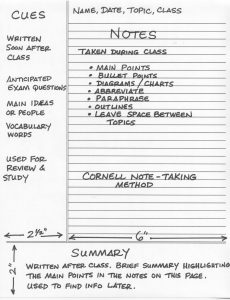
 The Cornell Method of taking notes is pretty straight-forward and helpful to people just starting out in the world of developing good study habits. The original plan was to take notes during lecture, then add your own comments and thoughts in a smaller column, then summarise every page at the bottom like the image to the right.
In 2008 a study (Jacobs, 2008) showed that this method is great if the student is required to synthesise materials (pdf). In the study against guided notes it showed that students could answer questions on a deeper, more thought-provoking level.
In my opinion, this method is also great for self-study, both for education and for one’s own research ideas.
The problems with using a straight up Cornell Method, however, seem to be numerous among students at Insanitek. We needed to show them some modifications so they could study more effectively with the Cornell Method as a foundation.
Step 1: Start With Imperfection
The first hurdle we had to help students get over was wasting valuable time during setup. They spent too much time creating the columns when they could get the work done, then go out and play. So, we told them to ignore that number of 2.5, eye-ball it, and use any straight edge (even folding the paper) to get it done.
We also got rid of the summary box. This makes it so the notes and ideas flow into each other seamlessly instead of being broken abruptly. Also, less perfection needed to set up that box as well, which means getting it done quicker.
Step 2: Colour-Code Your World
Did you notice the summary box was to highlight main points? Well, why not just use highlighters?
In that vein, there are different kinds of information:
- Vocab
- Concepts
- Examples
- Consequences of actions
- Important quotes
You get the point.
So, colour code it in a way that makes sense. Regular information in your normal pen, quotes and examples in one colour and a contrasting colour for concepts, theories, and laws. You can also use coded bullet points for lesser important things, such as examples (boxed) and cause and effects (arrows).
One thing we like to recommend is that you put graphs and diagrams on sticky notes. This helps you to see those visual examples in a hurry during review time, but also means you can remove it if you messed it up.
So, grab a few colours you like and a pad of sticky notes. Designate your colour code, and get ready to get to work.
 Step 3: Organise Your Info
In the left column you would write down the chapter headings and subheadings as you read. If you are using this method during lecture, it would be the topic and sub topics of the lecture. (Ask if you are unsure, but you can also use the slide titles and the like.)
Then, you’d write your notes as you read or listen in the right column. As you go, you will think of other things, hear recommendations, and need reminders. These are “quick notes” that you should put in the left column next to where you are taking notes.
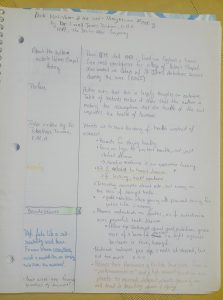
To the left you can see a copy of my recent readings on a historical view of health and nutrition and how that relates to soil health. At the top I have the book information, a bit about the author, then I start in on the introduction. I’ve highlighted a bit that got my attention and needs to be verified. Once it is verified (or not), I’ll write that on a sticky note and put it right on the page as an answer. I’ve also written my thoughts in the left column.
In the right column I’ve jotted down the primary points that the author is trying to get across. These are things that the author is constantly emphasising as important. I’ve also noted where science has disproved the thoughts that were commonly held at the time of publication.
Step 4: Personalise It As You Review It Daily
OK, here is the part that turns anyone from “meh” to “ah-mazing.” Later in the day, say when you get home from school, reread through your notes. Draw flags around important things you want to draw your attention to, put boxes around super important information, go crazy with stickers, etc. Use your creativity to highlight things in a way that not only makes you smile, but also allows you to find things at a glance.
I’m not that artistic, but I draw a quick flag on things that I find notable as I read. I also use washi tape, sticky flags, and coloured paper clips to draw my attention to things as needed.
Every day you add to your notes, that’s when you should go back and personalise it while you review what you wrote. It’ll help your memory while also making it easier to find info when you absolutely need it.